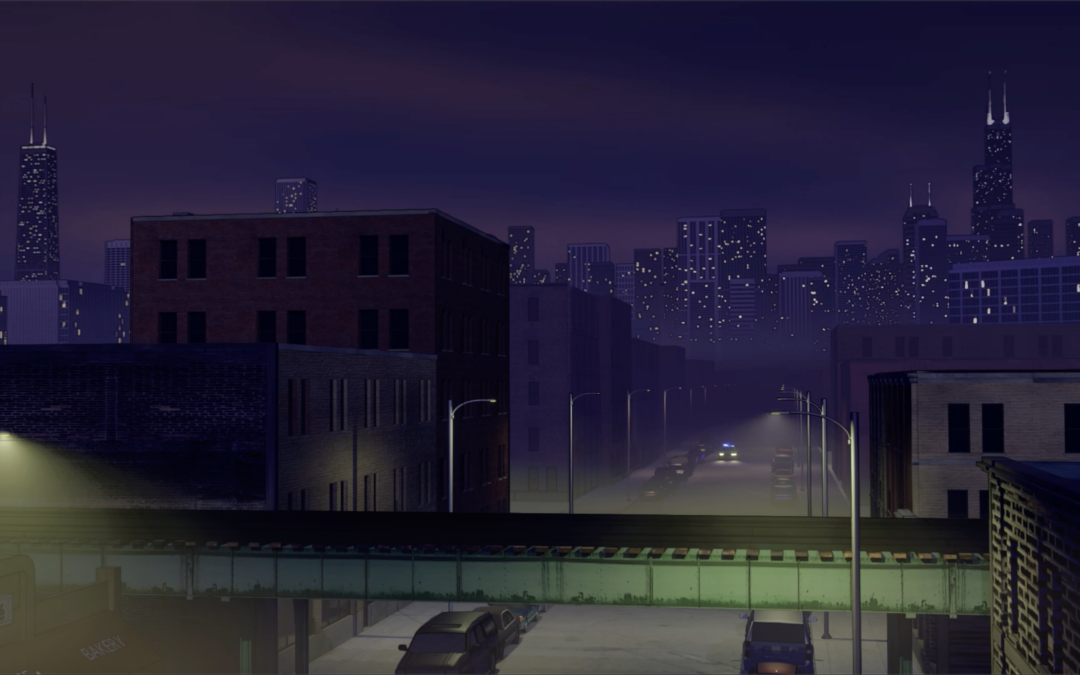
Chicago has always been a character on its own in Paradigm Shift. So, when I embarked on creating an animated version of PS, it meant I needed to bring the Windy City to life as well!!
I started with Kate’s apartment building. Using photos I had taken as reference, I modeled the architecture by hand, and then used my photos for the textures and materials.
Next, I needed to create a version of the back alley where poor James Wilson meets his untimely end. Using a model of the El tracks I modeled while creating the cover to The Art of Paradigm Shift, I built up a street scene based on the backgrounds in the opening scene. To create the buildings, I created modular sections of walls with various windows, doors, and brick colors which I then copied and pasted in various patterns to quickly build up the street. I then added various details to the buildings that would be closest to the camera. The cars are free models downloaded from SketchUp’s 3D Warehouse.
Lastly, I needed to create a 3D version of the Chicago skyline. To achieve this, I ended up using something called “procedural” buildings, which were automatically generated using a set of modular building pieces, kinda like LEGO bricks. Thanks to a tutorial by Kammerbild on YouTube, I developed a customized engine that could quickly generate new buildings of any size by plugging in the height, width, and depth, and customize the look by swapping out vertical and horizontal stripes. I can even turn the lights on and off at random. By using a couple of different sets of pieces, I could build up the entire skyline and have enough variation to create a useable matte painting that I then pasted into the background of my sets.
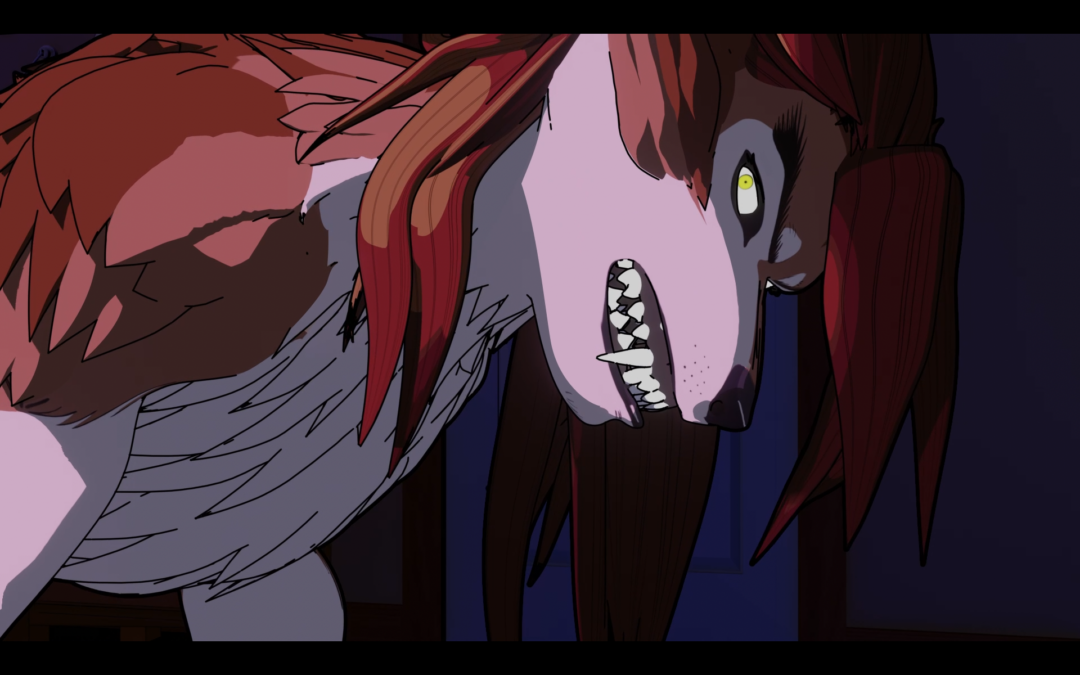
Curious about how I created the animation of Kate’s werewolf transformation? I’ve made a video that goes over the process I used to make it happen!
If you’re still curious about some of the technical details, and want to learn how to do something like this yourself, here’s some links to the tutorials I used:
First off, I used DAZ Studio’sGenesis 8 Female model as a starting point for Kate. Let me underscore that I did *not* model this starting figure. DAZ’s amazing artists did all the heavy lifting by creating that model. Since I had no idea how to create my own character rigs when I started this project, using a pre-rigged figure like Genesis 8 was a logical starting point. What I did need to learn was how to create “morphs” in Blender that could be used on the model.
Of course, this meant learning to edit the model in Blender. Now, in this case, I wasn’t starting from scratch. I’m an experienced 3D modeler, and have been working in 3D on and off for over 25 years—just mostly to create sets and architectural models. Character modeling is new to me, and I did have to learn Blender’s interface. This tutorial series from Blender Guru is the one I used to teach me the basics of using Blender’s modeling interface:
The key to making the transformations was to make sure all the parts of the model lined up up between forms. For instance, the polygons that made up the nose in the human model had to directly correspond to the polygons that would become the snout. In this case, it was my knowledge of anatomy that was the key skill. Whether you’re learning to draw or learning to model in 3D, there’s no substitute to learning the basics of human—and in this case, canine—anatomy. I had already thought through all this long ago when I designed Kate’s transformation for the comic:
If you want to see more the design of the werewolf transformation, you can find ALL of the sketches, sequences, and details in my art book, The Art of Paradigm Shift. You’ll also find tons of art, sketches, and tutorials in there, too!
Editing the textures for the Genesis 8 model was pretty easy. I just had to find the location of the original image files for the model in my DAZ library, copy them over to a new folder, and then create new ones in Photoshop. It also helped to have the UV Map templates that came with the model for free (downloadable for free from DAZ from your account’s asset library), which I used as a guide to draw and paint the new texture maps. Child’s play in comparison to drawing comics! 😉
If you want to learn how to edit your own textures in DAZ or Blender using Photoshop or another image editor, check out this tutorial from rdaughterDAZ : https://www.youtube.com/watch?v=bmbO0zoypJA
Download the UV Map templates here:
(This link only works if you have an active DAZ account.)
If you want to learn how to export a finished character out of DAZ Studio into Blender, I recommend using the DAZ to Blender Bridge. It’s pretty powerful, and will even export out all the morphs and modifiers that will keep the figure’s shape while moving. It even creates a rudimentary rig you can use to animate. It’s not as versatile as Blender’s built in Rigify armature, though. I recently found a great add-on called Rig GNS from 22722 Studios that will convert DAZ to Blender’s default armature to a Rigify one, though. It’s a paid add-on but worth the price in the amount of headaches it saves! I’ll definitely be using this as I move forward with new animation projects.
But this series called “Introduction to Rigging” on the Blender Studio site (requires a subscription, sorry) is the crash course I used to do a deeper dive on how rigging works. Don’t worry, though! You don’t need to be an expert rigger to start out!